I’ve written this as a guide for non-animators as a way for people to capture face scans from home in scenarios where I can get them in for a scan and hiring a capture studio isn’t an option. This isn’t intended on a full photogrammetry guide and leaves out a lot of the equipment for the most optimised scan. Whilst this is a vastly more DIY approach and could take several attempts to get right, it can still give the basis for a good digital double and can really simplify logistics for a project and even all for adhoc captures on set. With this said, I’ll guide you through all the steps you need.
The process used here is something called “Photogrametry” which is where you take a series of overlapping pictures which can then be interpreted by a computer to create a 3D model. In this case you
What you will need:
A high enough quality cameraphone - "RealityScan is available for iPhones and iPads running iOS 16.1 or higher, and Android phones and tablets supporting ARCore and running Android 7 (API level 24) or higher." https://www.realityscan.com/en-US/faq#faq-tcune3
A download of Reality Scan Mobile on your phone
Dropbox or Google Drive for saving images to send on
A fixed chair - so not one that pivots
Something you can use a fixed point to look at like a mic stand or something you can stick on a wall/window.
A well lit area but without strong shadows where there’s enough room to move
Ideally someone to use the phone to capture your face - self capture is possible but not recommended.
Optionally matte powder makeup to reduce shine
Optionally use a hairnet or find another way to keep hair off the subjects face
A solid internet connection to your phone when you upload.
Step 1 - Make sure you can get the app
Download the Reality Scan app here:
https://www.realityscan.com/en-US/mobile
You may need to scroll slightly down and there will be an option for the App Store or Google Play store depending on your device.
Once downloaded, set up an account with a login from Epic games if you don’t already have one. You’ll need this to use the app
Make sure you have Dropbox, Google Drive or another cloud storage system that will be easy to save to. Uploading could take some time, so make sure you’re near to a good connection for this process.
Step 2 - Get set up
To capture correctly you will need to make sure the person being captured is extremely still for the duration of the capture as the model you’re helping to create relies on location and fixing images to a 3D space in a consistent way. Blurry images will need to be disregarded and the more viable images, the better the end result will be. All being well this may only be about 5 minutes to capture.
To this end, make sure there’s a chair set up that doesn’t spin and isn’t on wheel or casters. A chair with a good back is fine. If you really can’t keep the person still enough you can opt to lay them on the floor but this will mean getting only the front of their head with the rest of their head shape then needing to use something created on a best guess in the computer later. You can opt just to capture the face, this is the key part however having room around the subjects chair will allow for a full head capture.
If you have access to an anti-shine powder, do use this. Avoid using shiny makeup or indeed any make up if at all possible. Makeup looks will be recreated later. Do not use false eyelashes - these will just get in the way of the capture - again these can be added to the double, and your head scan can be kept private in it’s unfinished version.
Keep hair out of the way of their face. If you have a hair net, put this over their hair, if not tie back or brush back hair to keep it off of their face and ears. Hair will need to be fully recreated so we’re not aiming to capture the look of their hair. The aim is to get an accurate 3D face shape and if possible to take some texture from their skin if that makes them more recognisable.
Set up something for the subject to look at - let’s refer to this as their “target”. I work with a lot of musicians, so I’d normally suggest a mic stand at their seated eye level about 2 meters away where they can stare at the mic, or stick a post stick on window. Whilst they are absolutely allowed to blink, ideally try and make sure you get enough images at the front from different levels where their eyes are open.
Make sure they are facing towards the brightest source of light in the room. When I captured my own head I faced towards the window. Avoid any really strong or contrasting lights. If possible, have only natural light or indoor lighting, not a mix of both.
Step 3 - Capturing
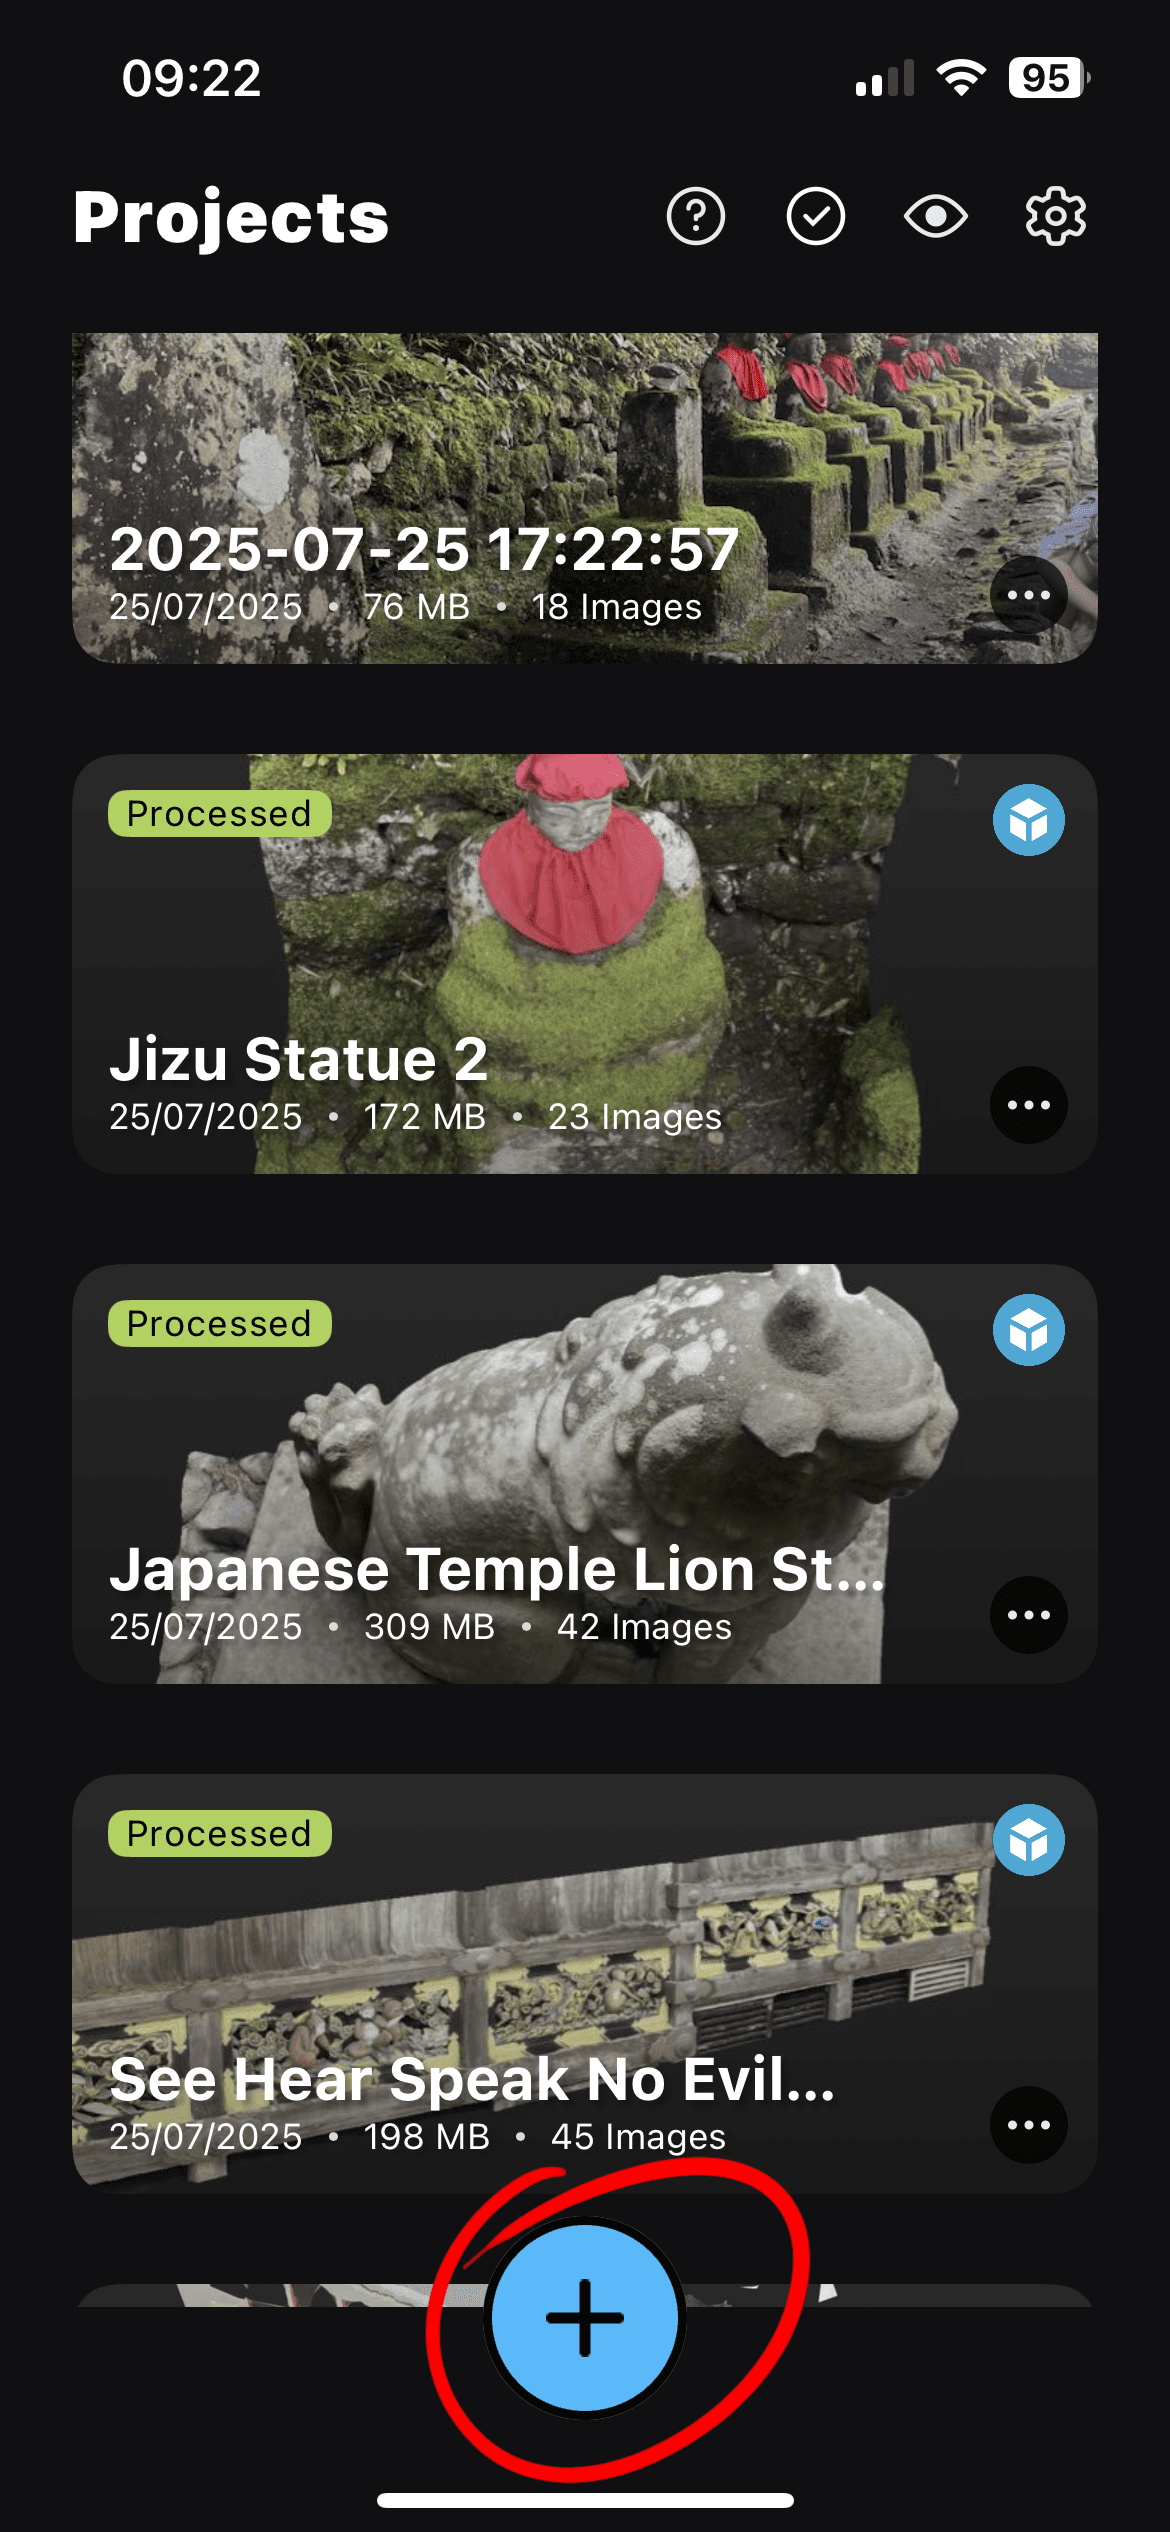
Open Reality Scan and tap the plus (“+”) icon at the bottom of the screen. Select “AR Guidance mode”.
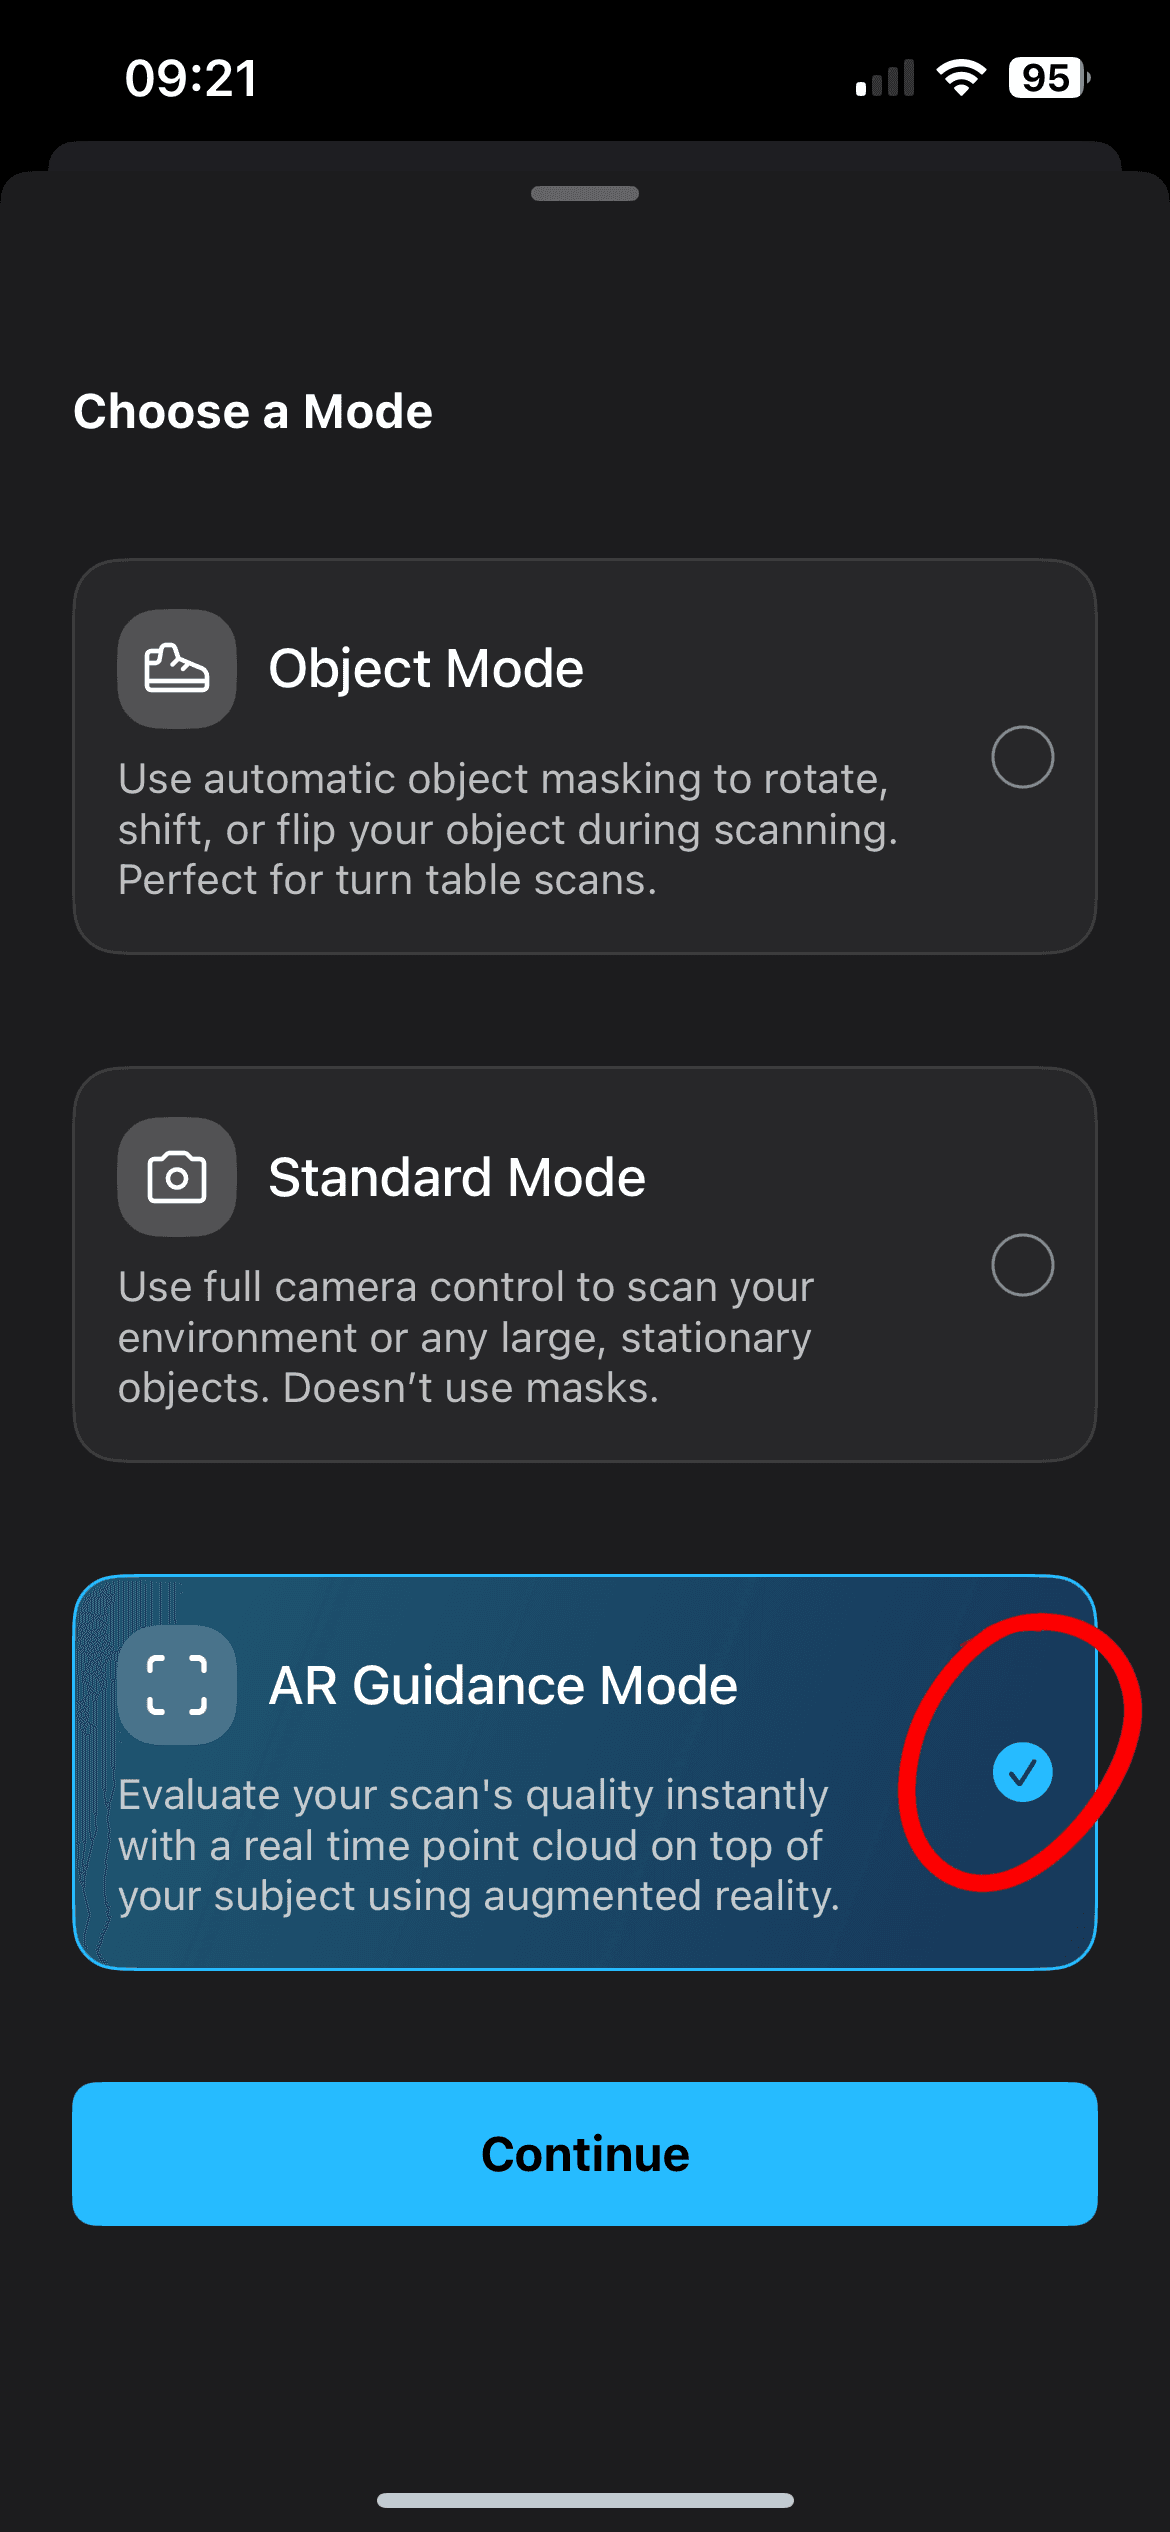
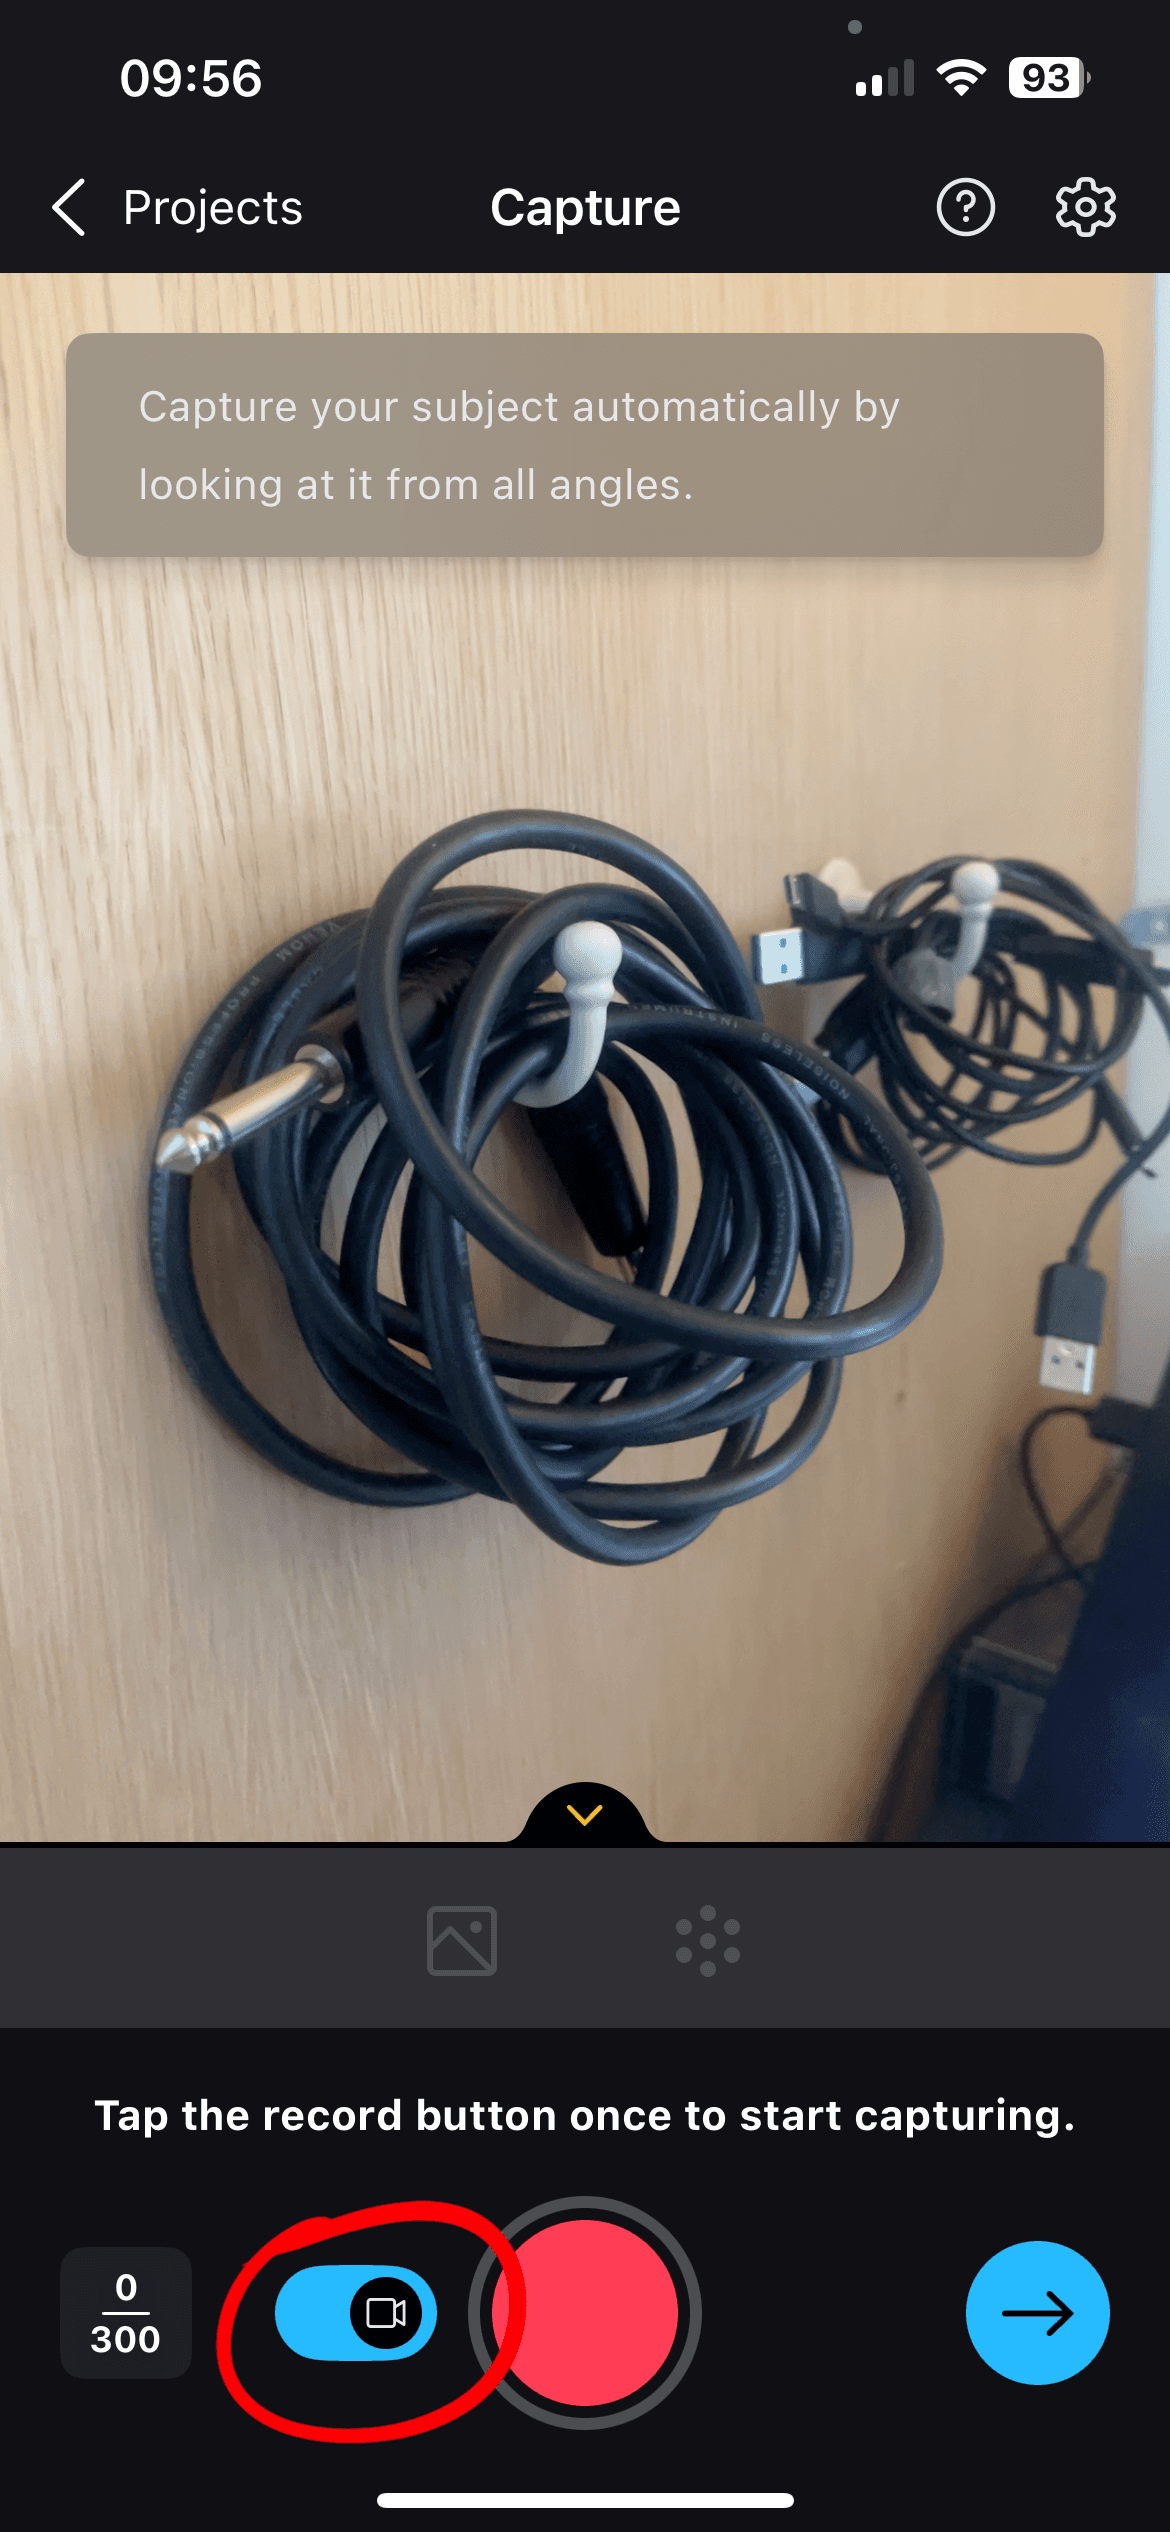
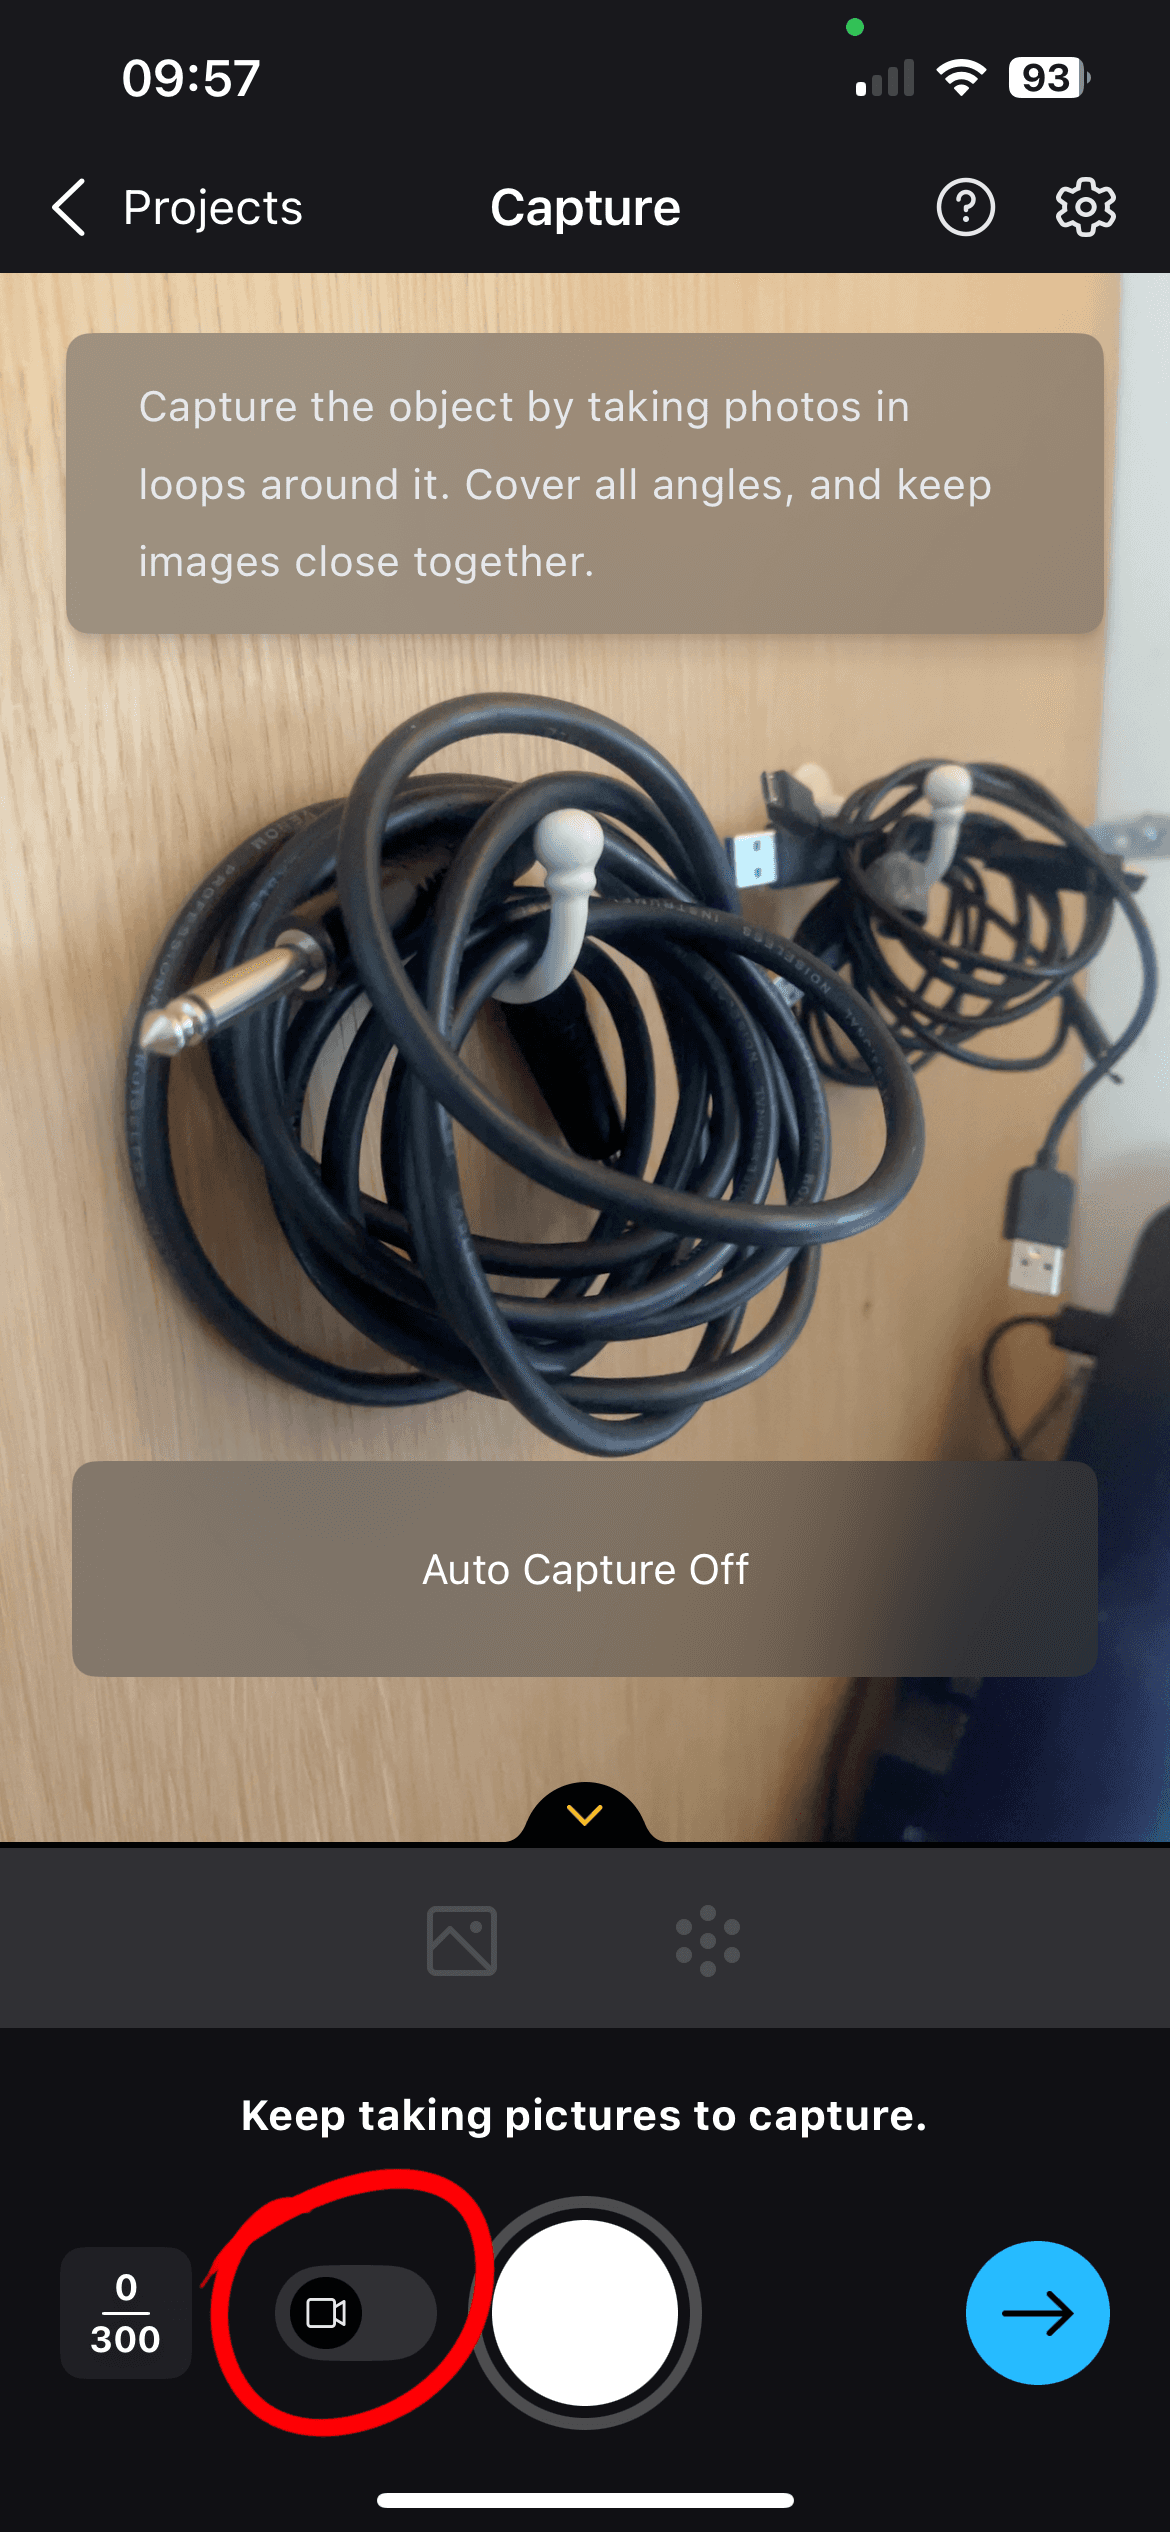
There are two modes (see images below) - auto capture is on automatically but if you want to disable this you can press the blue toggle with the camera icon and this will switch off, turning the central capture button white from red. I’d recommend you keep this on to start with but then come back to this later to get a few extra shots to ensure there’s no blinking.
Start by making sure the subject is sat upright but comfortable in a way they can keep still for at least 5 minutes. When you are ready, have them look at the target. They will need to keep that gaze in the same spot even if you move in front of them - avoid looking away or down.
When you’re ready press the red button to start the auto capture and whilst keeping at their eye level, walk slowly all around them allowing the phone to auto capture whilst pointing the camera towards the subject. Ideally keep just near enough to get their full head in shot. You should see AR versions of the images floating in 3D space around the subject as this happens.
Once you have got around all the way back to where you started, lift you camera up higher to start getting them from a slightly higher angle so you are then looking down onto their head. Capture all the way around until you come back to your starting point.
Now crouch down and capture from underneath - yes you will effectively be pointing the camera to look up their nose - and whilst these images aren’t anything anyone really wants printing off – these are vital to establish the shape of the jaw, nose and other features - without which the scanning process will guess and fill in with shapes that aren’t really there.
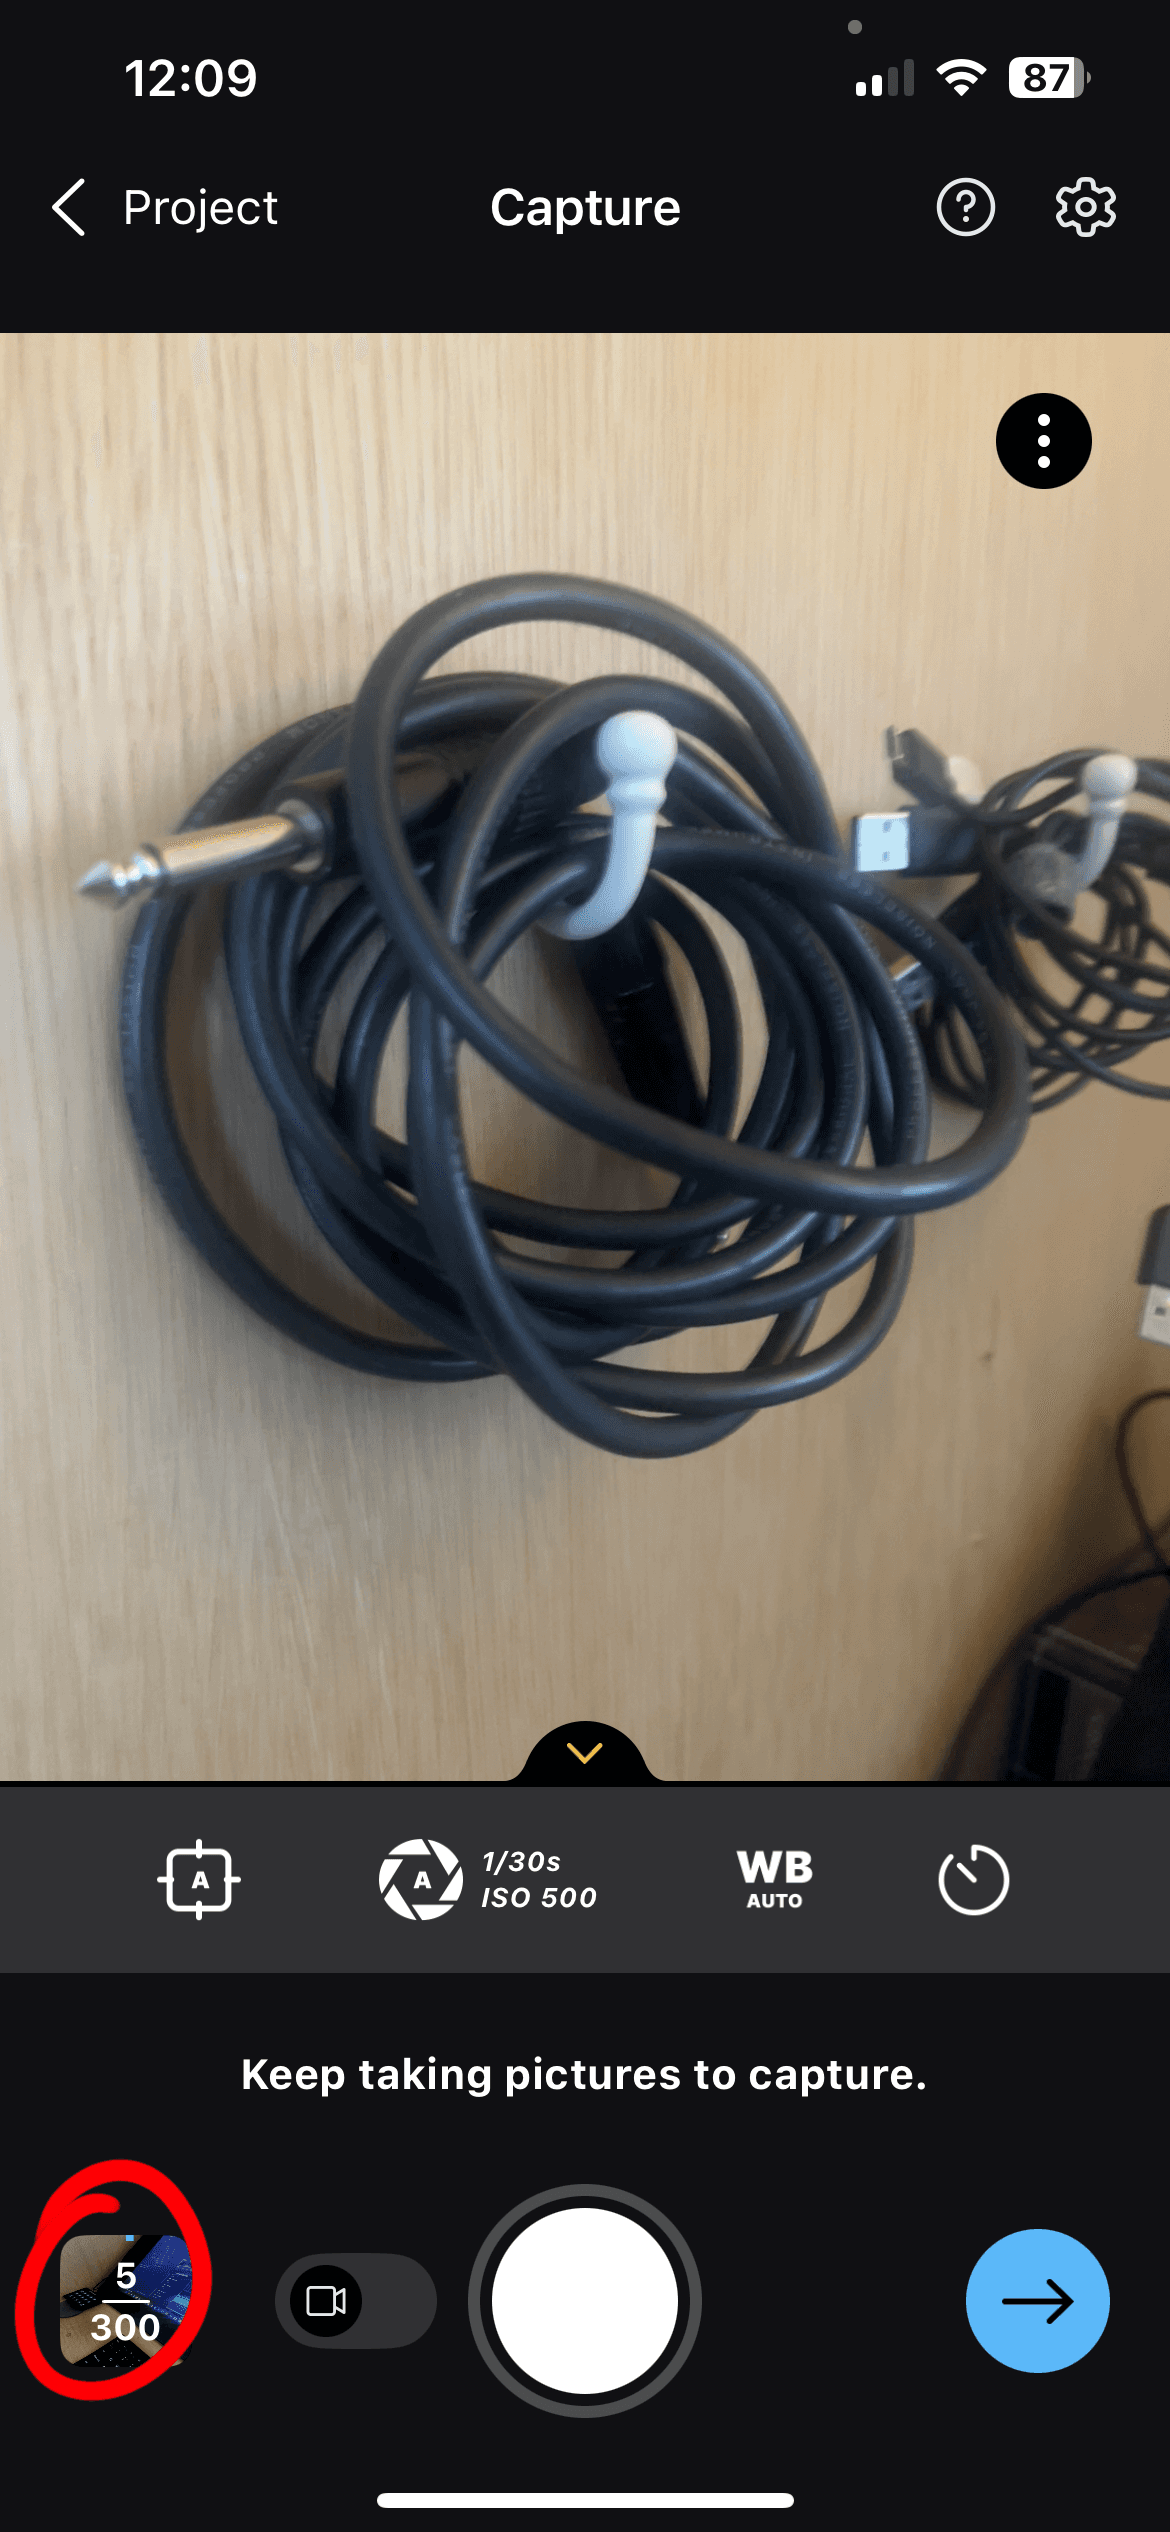
Come out of auto capture and get a few extra shots at different heights around the face, asking the subject to hold off blinking between each shot. If you’re subject is happy to do a slightly longer session, do another rotation from slightly further away - the more variation in the shots the more the computer has to work with. You can also get extra shots around the face as a “just encase”.
Ideally you’ve ended up with about 100 to 200 pictures. These will be narrowed down my side and may even come down to 50 good images but more is better and it will be down to how well the images overlap as to whether the process accepts them. Whilst the app can have a good at processing these I'd recommend again processing on your phone as some phones won't will get stuck if they aren't high spec. The mobile version also won’t be as good as the version I will be able to construct on the desktop version of Reality Scan. If you do have a fairly high spec phone you are welcome to try processing it to see if it has any obvious gaps (however I don’t recommend you take up time with this yet given the next step).
Step 4 - Uploading your images
Firstly, make sure you’re near a solid internet connection. You’re about to upload potentially a few Gigabytes of images.
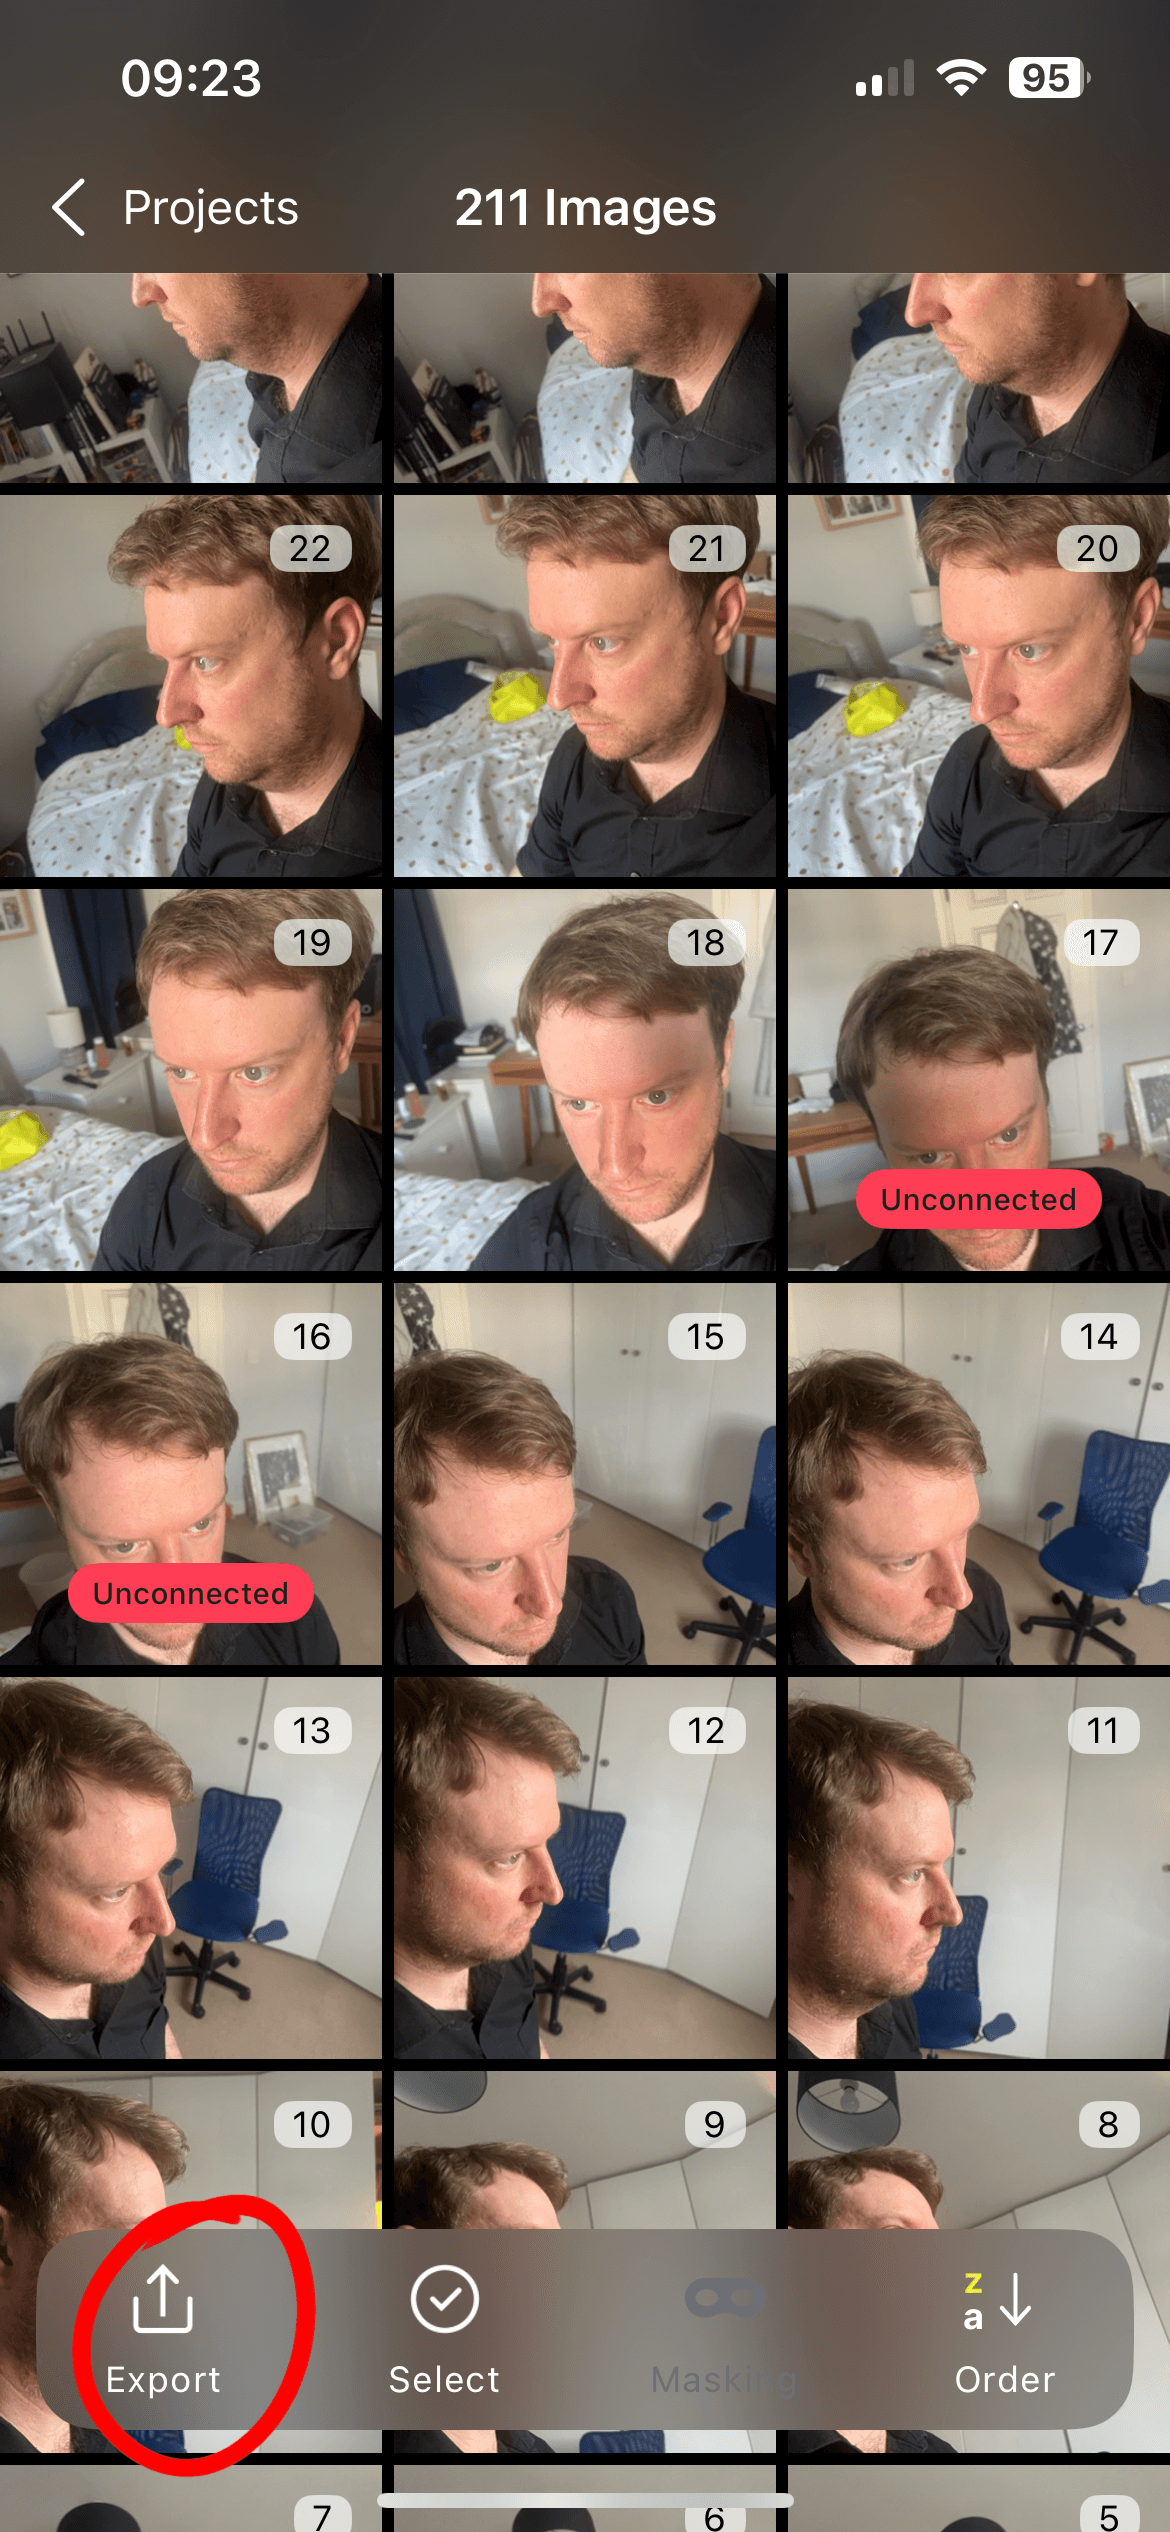
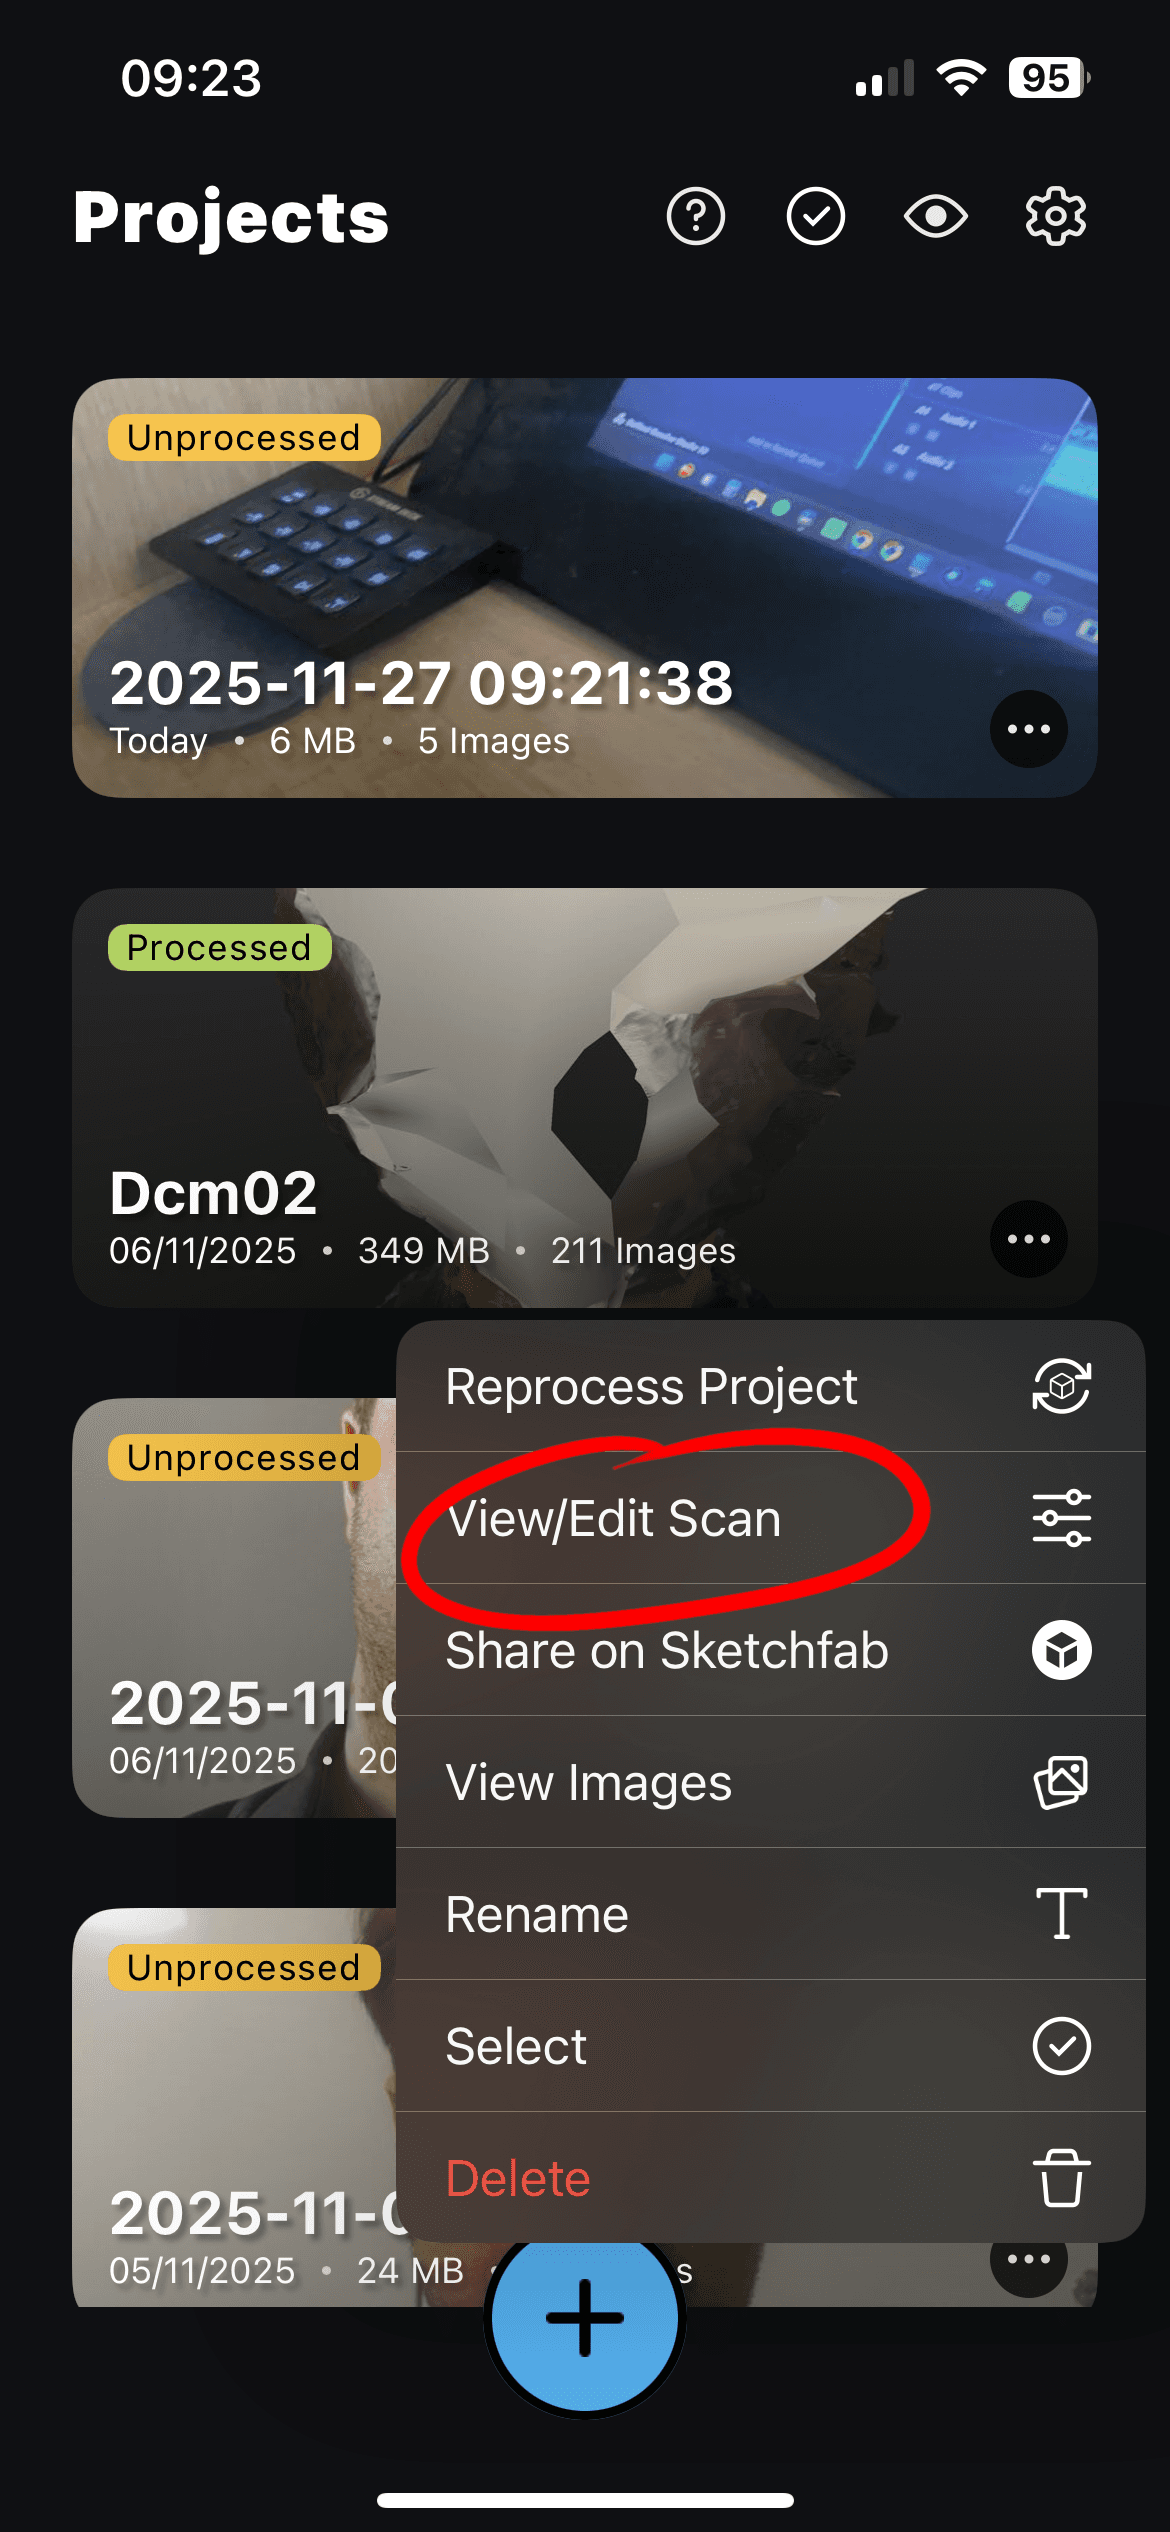
When you finish capturing, tap the icon in bottom left that shows your images. If you accidentally exited to the Projects window press the three dots and go to “View Images”.
In the bottom left you will see a button labeled “Export”. This will take some time and generate a zip folder with all of the images you have just captured.
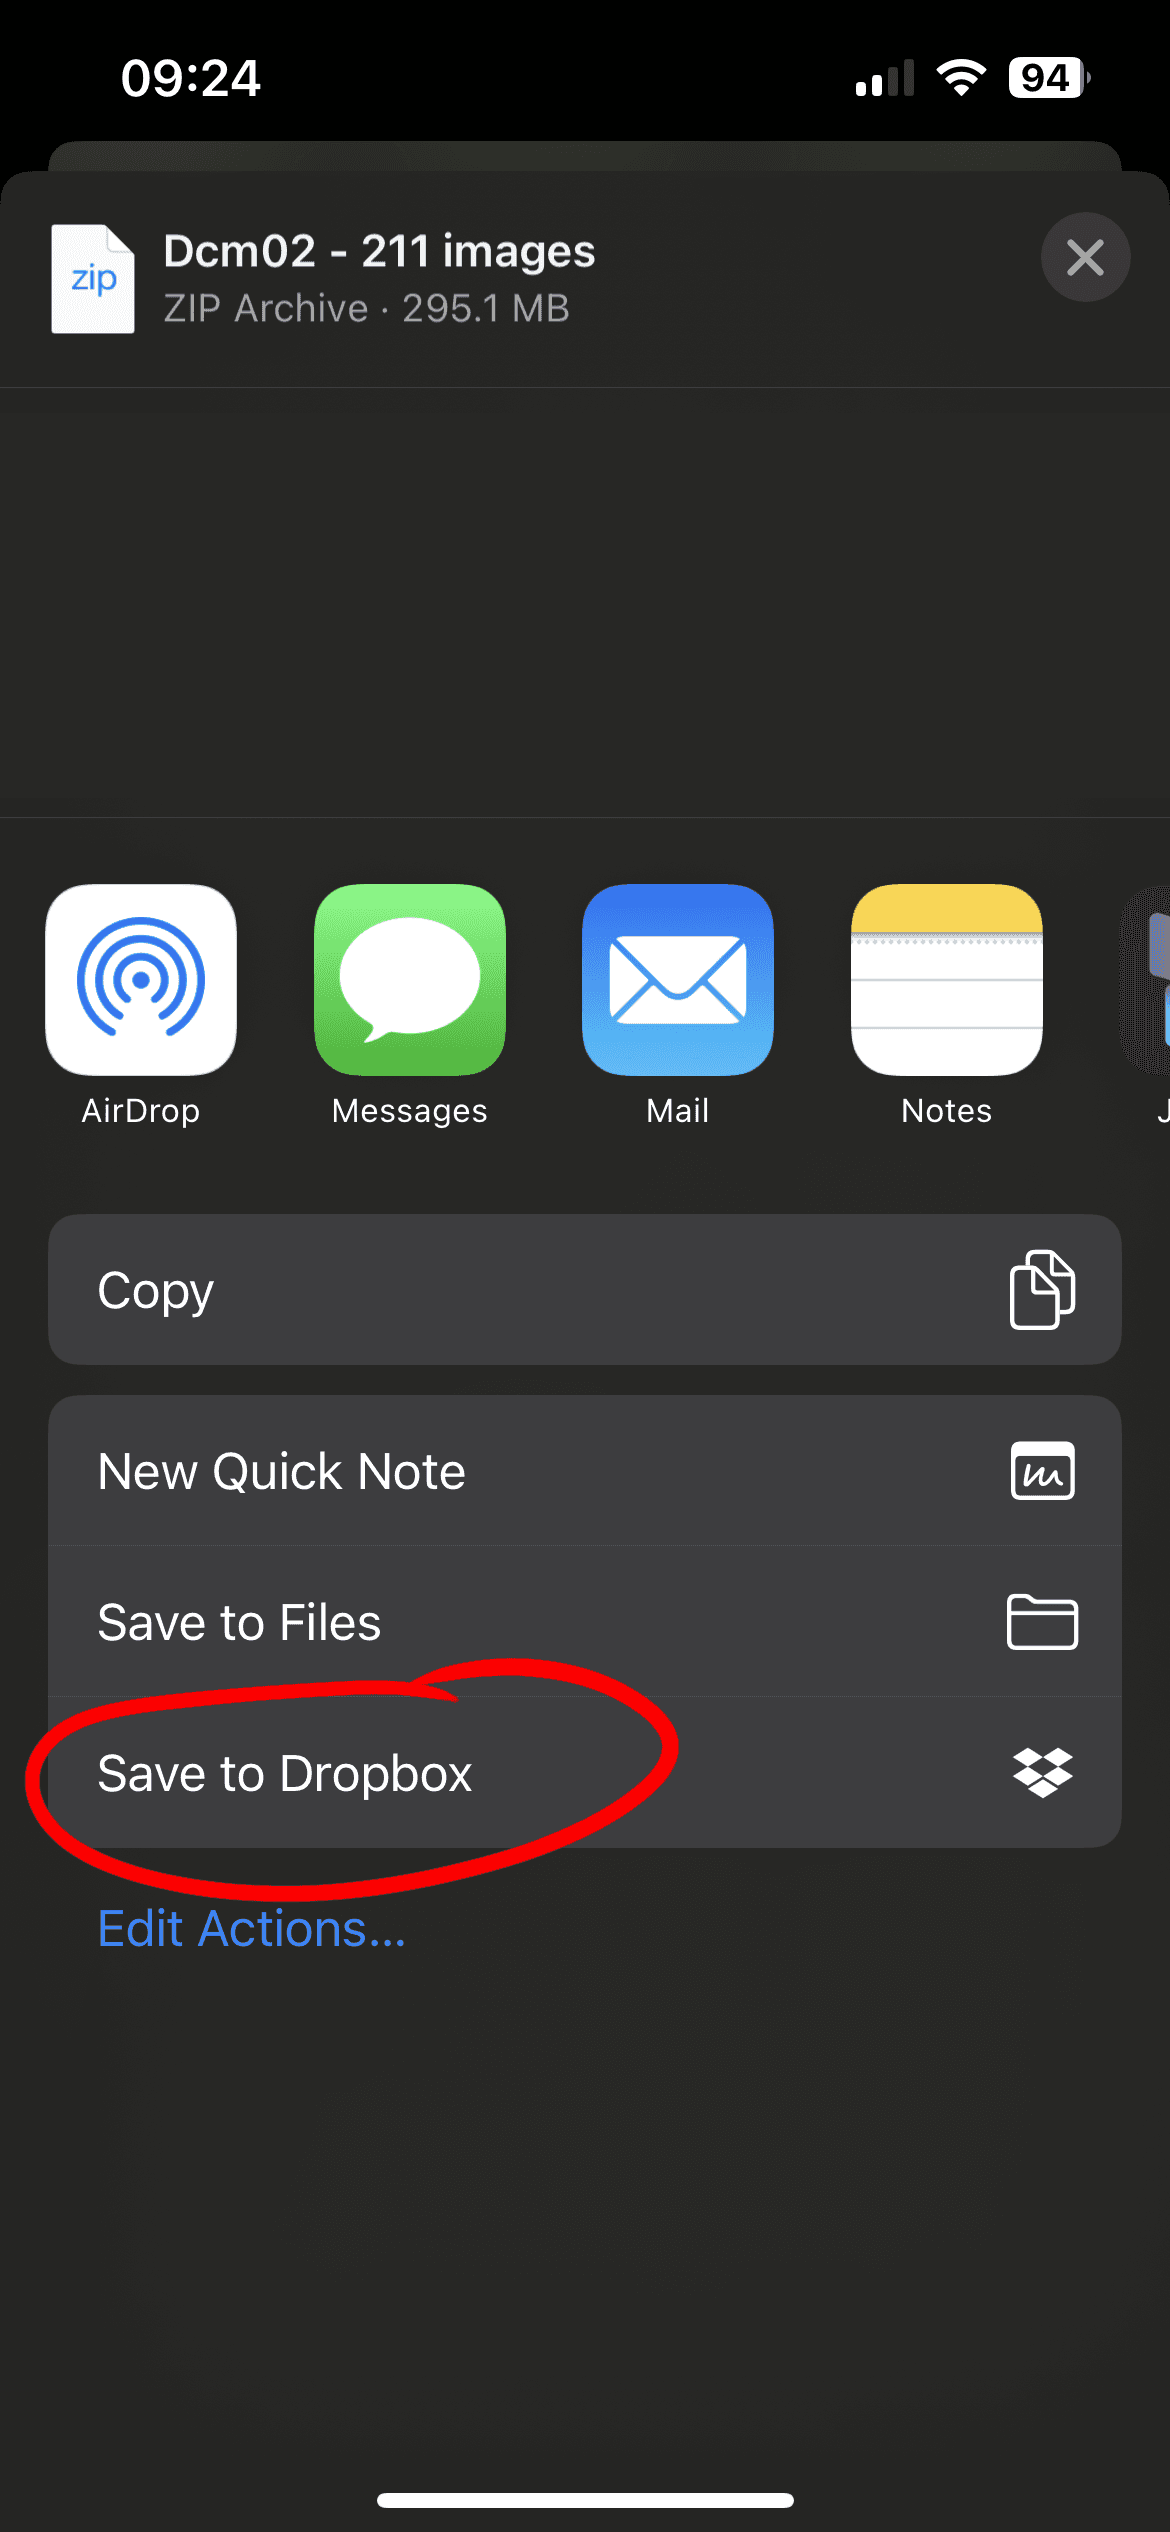
When this is finished it will give you the option to save these somewhere. I’d recommend you save these to Dropbox or another cloud storage system you are already used to saving to. Make sure to put these in their own folder so that you’re happy to share a link to this and not other files you may have stored.